Why do so many homes suffer from cracks, bubbling, or wall damp even after a fresh render? You’ve seen it—surfaces start pristine, only to fail months down the track. The reality is, surface coatings alone won’t prevent damage. What makes a real difference is how the render is prepared, applied, and maintained. If you’re weighing up whether applying acrylic render is worth the effort, this guide lays it all bare. This article examines the impact of applying acrylic render on wall durability, its limitations, and strategies for achieving lasting results.
What kinds of damage can applying acrylic render help prevent?
Acrylic render isn’t just another coating—it’s built to handle stress. When used correctly, it defends against structural wear and cosmetic decay. Here’s how it holds up:
- Cracking: Acrylic flexibility allows it to move with your walls, reducing surface splits over time. This is especially helpful with fibre cement or foam-based cladding, where some movement is normal.
- Moisture intrusion: It resists water, making it harder for damp to creep in and ruin plaster or insulation. This barrier effect is crucial in Sydney’s rainy winters, particularly on older brick or porous surfaces.
- UV damage: The polymer blend is sun-hardened, protecting the finish from fading or chalking. Over time, UV resistance helps extend the surface colour and clarity.
- Algae and mould: Its surface dries faster, making it less likely to harbour biological growth. Quick-drying prevents mildew and spores from clinging to shaded, damp areas.
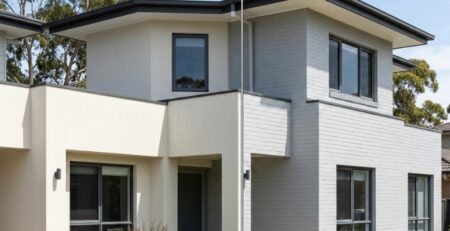
These qualities make it ideal for Aussie homes that cop with both scorching summers and heavy storms. Done right, it works a charm.
Why do some homes still face issues after applying acrylic render?
Despite its strength, acrylic render isn’t invincible. You have to get the prep and technique right—miss a step, and the render won’t last.
- Improper substrate prep: Dusty or oily walls prevent proper bonding, leading to delamination. Sanding or washing before application is a non-negotiable.
- Lack of sealing or priming: Bare surfaces stay porous, causing the render to dry unevenly or trap moisture. This is a common misstep that weakens the overall finish.
- No expansion joints: Walls shift with heat, and without joints, render can’t flex—it’ll crack. This is essential for longer walls or foam installations.
- Cheap mixes or rushed jobs: Lower-grade materials don’t cure properly or hold up under pressure. Saving on materials often leads to more costs down the line.
These errors undo even the best materials. That’s why understanding the effective ways of applying acrylic render to prevent surface damage is key to long-term performance.
What happens if sealing is skipped before applying acrylic render?
Skipping the sealer is like painting over dust—looks fine at first, but it won’t stick for long.
- No barrier against moisture: Water creeps in, soaking the substrate and ruining adhesion. Over time, this leads to swelling or bubbling under the render.
- Uneven curing: Porous spots soak up render, causing blotches and surface weakness. This results in inconsistent strength and early wear.
- Increased risk of flaking: Render peels, especially around corners or joins. Without sealing, even topcoats can’t compensate for poor base bonding.
- Stains and efflorescence: Unsealed walls leach minerals, staining the surface a white colour. It’s a visual cue that the wall wasn’t sealed correctly in the first place.
This one step often gets rushed or skipped—but sealing is what locks everything down. In short, prep makes or breaks your outcome. Using the right acrylic render can significantly elevate the exterior look and durability of even the best double-storey house designs, making them as resilient as they are stylish.
How do climate and wall conditions affect acrylic render performance?
Even with perfect prep, render must cope with the environment. Aussie conditions can be brutal—and unforgiving.
- Humidity and heat: Excessive moisture delays the curing process, weakening the final bond. Curing in humid summers can lead to sticky finishes and trapped air.
- Strong UV: Harsh sunlight degrades surface layers, especially without topcoat protection. Over time, this reduces elasticity and causes brittleness.
- Storm exposure: Driving rain erodes thin areas, causing rapid wear. Splashback zones and unsheltered corners wear out first.
- Existing wall flaws, such as cracks, swelling, or movement from materials like Hebel or foam walls, can disrupt the finish. These faults are evident even through thick layers of acrylic.
Every wall and weather pattern is different—flexibility is key. Regulations also vary, so it pays to know how wet plastering work is regulated and licensed in NSW before starting a project.
Which rendering methods make applying acrylic render more effective?

Render is only as good as the method behind it. Here’s what sets strong jobs apart:
- Sealing and priming: Start with a clean, sealed wall—it’s non-negotiable for adhesion. This supports even drying and prevents premature shrinkage.
- Using mesh reinforcement: This prevents cracking, especially at joins or over foam cladding. Mesh spreads movement evenly across the surface.
- Applying during mild weather is recommended, as hot or cold extremes can disrupt the curing process. Aim for dry, temperate days—no rain for 48 hours minimum.
- Layering correctly: Allow each coat to cure—don’t rush or skip texture phases. This includes waiting before applying finish coats or paint layers.
For different wall types, approaches vary. You’ll find trusted advice on choosing surfaces for acrylic render that aligns with the method and material.
When is render paint a smart maintenance upgrade?
Acrylic render doesn’t need much upkeep—but render paint adds long-term protection and helps refresh ageing finishes.
- For UV protection: Paint adds a sunscreen layer, preventing fading and chalking. Good paint doubles as a weather shield.
- To resist stains: Paint makes walls easier to clean, especially in high-traffic areas. Kitchen splashbacks and rear laneways benefit most.
- To seal microcracks, quality acrylic paint fills hairlines, preventing moisture from seeping in. This lowers the risk of long-term damage.
- To change colours: Updating tones can modernise older projects without full resurfacing. Colour consistency also improves resale appeal.
If you’ve got smooth acrylic already, applying render paint becomes part of quality maintenance advice for smooth acrylic render—keeping it looking schmick without ripping everything back.
Summary table: What influences acrylic render success
| Factor | Effect on Longevity | Why It Matters |
| Wall prep and sealing | Ensures adhesion and moisture resistance | Avoids flaking, efflorescence, and delamination |
| Environmental exposure | Affects curing and surface strength | Heat and UV can cause cracking or fading |
| Render system used | Impacts flexibility and durability | Full acrylic systems resist movement and mould |
| Mesh reinforcement | Reduces cracking from structural shifts | Especially key for foam cladding or expansion joints |
| Final coating or paint | Adds waterproofing and UV protection | Protects finish and extends life |
Final thoughts
Acrylic render can stop long-term damage—but only if applied with care. Surface prep, sealing, and curing all play their part, as do product quality and the local climate. For homes in Sydney, it’s worth tailoring the job to the materials involved and the conditions expected. If you’re considering upgrades or repairs, it’s helpful to have a walkthrough from seasoned professionals. You’ll find what Jim’s Rendering Sydney recommends for durable wall finishes, based on years of experience.