What Is The Difference Between Plastering And Rendering?
Plastering is the act of applying drywall or other materials onto interior or exterior walls, ceilings, and floors. Acrylic rendering is the act of painting over existing surfaces such as walls, ceilings, and even furniture. Which should you choose?
Plastering involves using drywall (a type of gypsum board) to cover walls and ceilings. This material comes in sheets that are cut to size before being applied. The final result looks similar to the wallpaper.
Rendering is the act of covering anything with paint. Paint is usually mixed with water and then sprayed onto surfaces. Once dried, the surface becomes smooth and glossy.
Plastering is typically done by professionals who specialize in the trade. They apply drywall or other materials to the walls and ceilings. On the other hand, rendering requires skill and experience. If you want to paint something, you’ll need to hire someone who knows their way around a spray gun.
There’s no right answer when choosing between plastering and rendering because it depends on your situation. For example, if you’re planning to use your home for commercial purposes and will have employees working inside, you may want to consider hiring an interior painter. Otherwise, if you live alone and only plan to enjoy your home yourself, you might want to get a job done at your local hardware store.
The first step towards finding out which option makes more sense for you is to determine what exactly you want to be done.
Are you looking to give the exterior of your house a fresh coat of paint? Do you just want to spruce up the walls? Or perhaps, you want new flooring throughout your entire home.
Whatever you decide, there’s no wrong choice. You just need to make sure you pick one method and stick to it.
As stated above, plastering is done by professionals while rendering is most often done by amateurs. Both methods require proper skills and tools. So which is easier?
Well, it really depends on how experienced you are. A professional plasterer has been doing this for years. He or she would know all the tricks needed to ensure a perfect job.
What Is A Render?
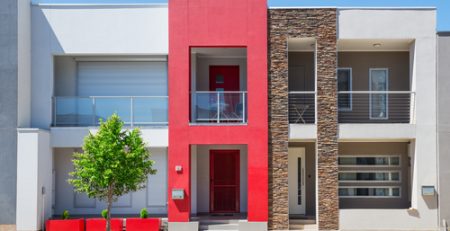
A render is a coating used to protect the surface of your building from moisture damage. It’s also known as a protective coat. In addition to protecting against moisture, rendering also gives your home a beautiful look.
Render contains a mixture of either concrete or cement sand water. When applied properly, it creates a durable, waterproof, and attractive layer on your interior walls and ceiling.
For those who aren’t familiar with the term, here’s a quick definition:
“Cement” refers to a mixture of lime, clay, and sand. Cement is what holds the render together after it dries.
“Sand” refers to quartz, mica, and other types of stone dust. The sand acts like filler and helps create a smooth finish and texture.
There are two main kinds of render:
Concrete render
Concrete render is made with cement and sand. It’s easy to work with and doesn’t require much maintenance once it’s applied. Because of its durability, concrete render is ideal for homes where children or pets frequently play outside.
It can last anywhere from five to ten years. However, if you do notice any cracks or holes appearing on your concrete render, you should call a professional immediately.
Concrete render is available in three different textures:
– Smooth: This is the most common kind of concrete render. It provides a smooth, polished appearance.
– Polished: This concrete mix has a slightly rough texture. It’s great for outdoor areas such as patios, driveways, and walkways.
– Textured: This concrete mix has large grains that add a gritty texture to the finished product. It’s best suited for indoor applications such as kitchens, bathrooms, and living rooms.
Fibre-cement render
Fibre-cement render is a combination of cement and a type of fibre called polypropylene. Polypropylene is similar to wood pulp but is stronger and lasts longer.
This type of render comes in four different colours:
– White: This white colour looks almost identical to regular plywood.
– Dark Grey: This dark grey colour looks like drywall. It’s suitable for both indoor and outdoor uses.
– Light Grey: This light grey colour resembles hardboard (a type of sheetrock). It’s suitable for both interior and exterior uses.
– Black: This black colour looks like metal. It’s strong and durable and is good for kitchen countertops and bathroom floors.
How to apply render?
You can use a trowel or roller to apply the render. If you’re using a roller, make sure you roll it evenly across the entire area. Otherwise, you could end up creating a patchy effect.
If you want to achieve an even application, try using a trowel instead. You’ll need to start at one corner of the room and then move towards the opposite side.
When applying acrylic rendering to your walls, always keep in mind that the higher the wall, the more difficult it will be to cover. Start off slowly and gradually build up coverage until you reach the top of your walls.
Once you’ve covered the entire floor area, it’s time to let it dry. Depending on the weather conditions, it may take between 48 hours and 72 hours to completely dry.
After the render dries, you can use fine sandpaper to lightly rub down any imperfections. Then, you can either paint or wallpaper the walls.
Rendering tips
Use a quality sealer when applying render. A high-quality sealer will help prevent moisture from penetrating into your render.
Always clean your hands before touching the sealant. Gloves are recommended because they protect against germs.
Don’t forget to wear gloves while doing anything else around the house, especially when cleaning up after yourself.
Never touch the surface of your render without wearing protective gear. Also, don’t place objects directly onto your render. Instead, lay them on a flat surface first.
If you have kids, consider purchasing a child safety gate so that they won’t accidentally fall through the render.
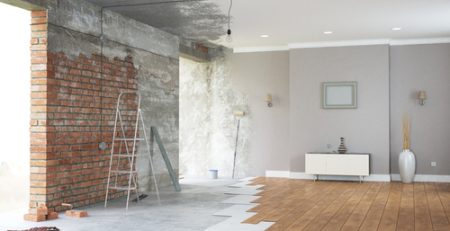
What Is Plastering?
Plastering is a process that involves applying a thin coat of plaster inside a room. This coat is then allowed to dry before another coat is added. Once the process is complete, the plaster becomes rock solid.
The plaster itself consists of gypsum mixed with water, along with various additives. These additives are responsible for giving plaster its properties.
Here’s some information about these additives:
– Calcium Chloride: Calcium Chloride improves the setting properties of the plaster. It makes the plaster more flexible and allows it to adhere better to surfaces.
– Alkali Silicate: This additive prevents the formation of calcium chloride crystals within the plaster. It also reduces shrinkage when the plaster sets.
– Acrylate Emulsion: This emulsifier creates an even distribution of the plaster particles throughout the water. It also helps prevent the formation of lumps in the plaster.
– Waterproofing Additives: These additives help make the plaster waterproof. They also reduce the amount of moisture that seeps into the plaster during the curing process.
– Drying Agents: These agents increase the speed at which the plaster cures. They also improve the strength of the plaster.
– Curing Agent: This agent is used to initiate the chemical reaction that causes the plaster to set.
– Plasticiser: This plasticiser increases the flexibility of the plaster. It also helps the plaster absorb less water.
– Colourants: Colours are added to give the plaster its final look. These colours include pigments, dyes, and other additives.
Rendering Vs Painting
Painting is the application of paint onto a surface. In this case, the surface may not necessarily have been previously constructed.
Rendering is the application of plaster on top of existing structures. When done correctly, there will be no visible difference between the two processes.
When determining whether you need to use plaster or paint, consider your budget, the size of the area, and how much work needs to be done.
If you’re planning on doing large areas of painting, you should probably use plaster instead of paint. If you’re only working on one small area, the painting would be sufficient.
In most cases, plaster is cheaper than paint so if you’re looking to save money, plaster could be a great option.
Advantages Of Using Plaster Over Paint
There are many advantages of using plaster over paint. Here are just a few:
– Plaster is easier to apply than paint. With plaster, all you need to do is mix up the components and pour them into the prepared area. With paint, you need to prepare the surface first. Then, you’d need to add the paint, let it dry, and then wipe off any excess paint.
– Plaster is easy to clean. Because it does not contain oil-based paints, it is very easy to wash away. You don’t need to worry about leaving behind any smears or marks from cleaning.
– Plaster lasts longer than paint. Due to the way it dries, plaster tends to last longer than paint. On average, a painted surface can last anywhere from 10 days to 6 months.
– Plaster doesn’t require maintenance. Unlike paint, plaster requires little to no maintenance. Once it’s installed properly, it will stay in place for several years without requiring any additional effort.
– Plaster can be customized. While the paint is usually limited to what the manufacturer has designed, plaster allows you to create unique designs and patterns.
If you want to know more about improving your house you can check it here “Top 5 Home Improvement Ideas That Adds The Most Value”